4. Using the DVS Calibration App
This chapter uses the circle grid prepared in Chapter 3 to perform the actual camera calibration. Keep the monitor pattern fixed, then move the camera with its fixed tripod so that the grid appears at different image positions, distances, and tilts. Record a segment at each pose. The application finds circle centres in each segment and uses them to calculate mono or stereo calibration values. The goal is not one sharp image, but observations that cover different sensor regions evenly.
4.1 Start from DVS Viewer
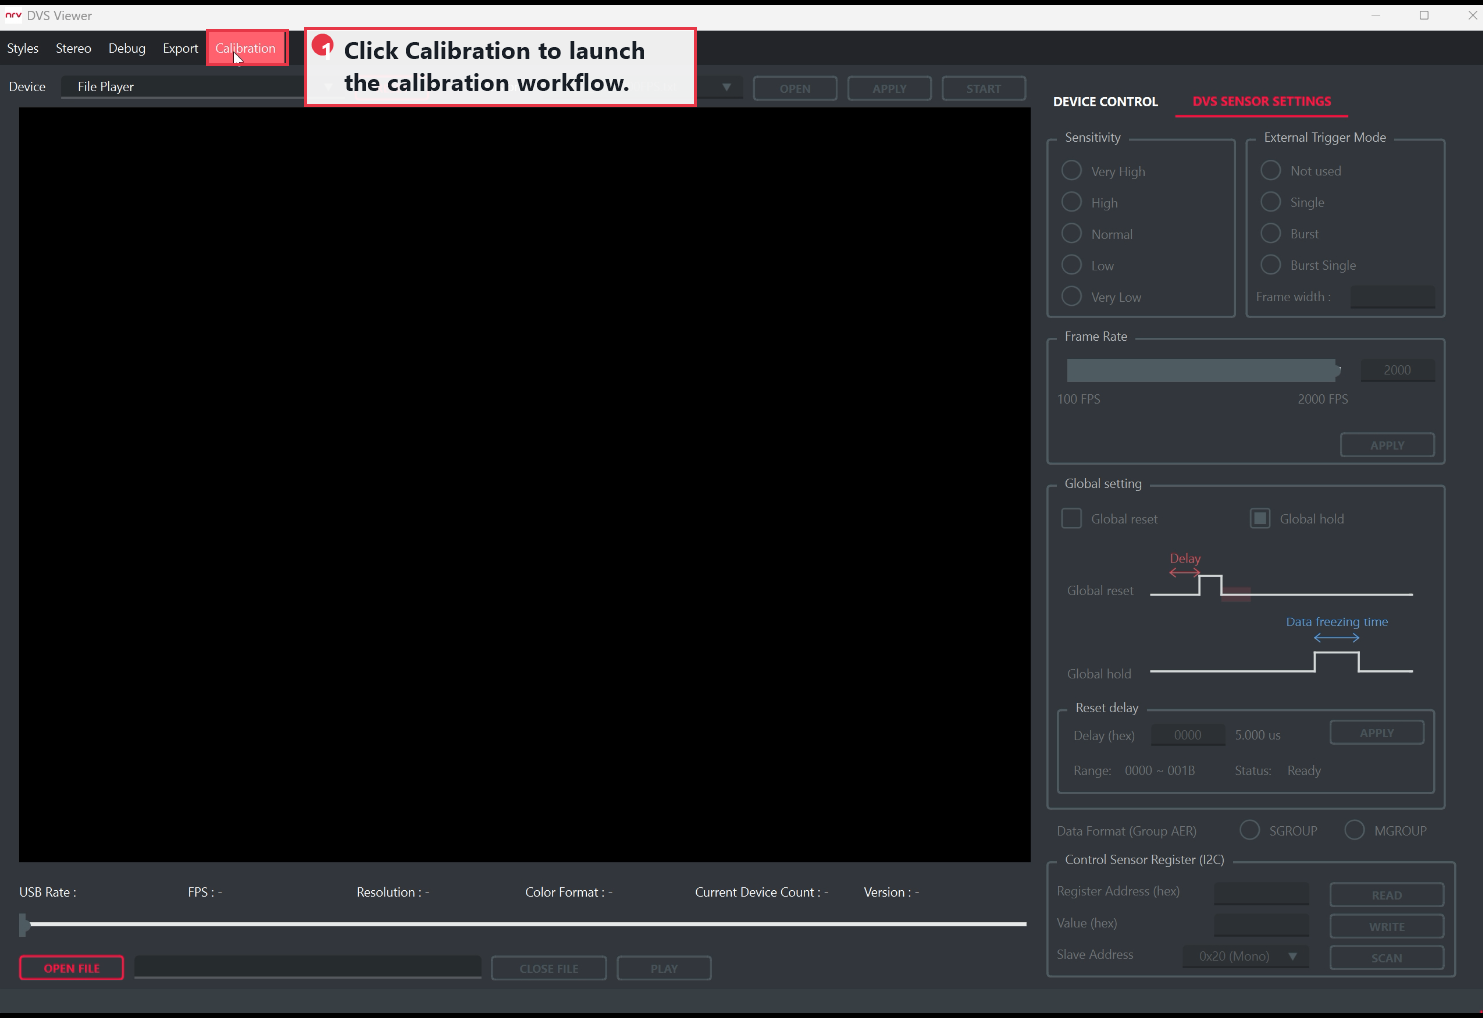
Confirm that the camera is connected in DVS Viewer, then select Calibration. The viewer closes and opens DVS Calibration.
4.2 Confirm camera detection and measurements
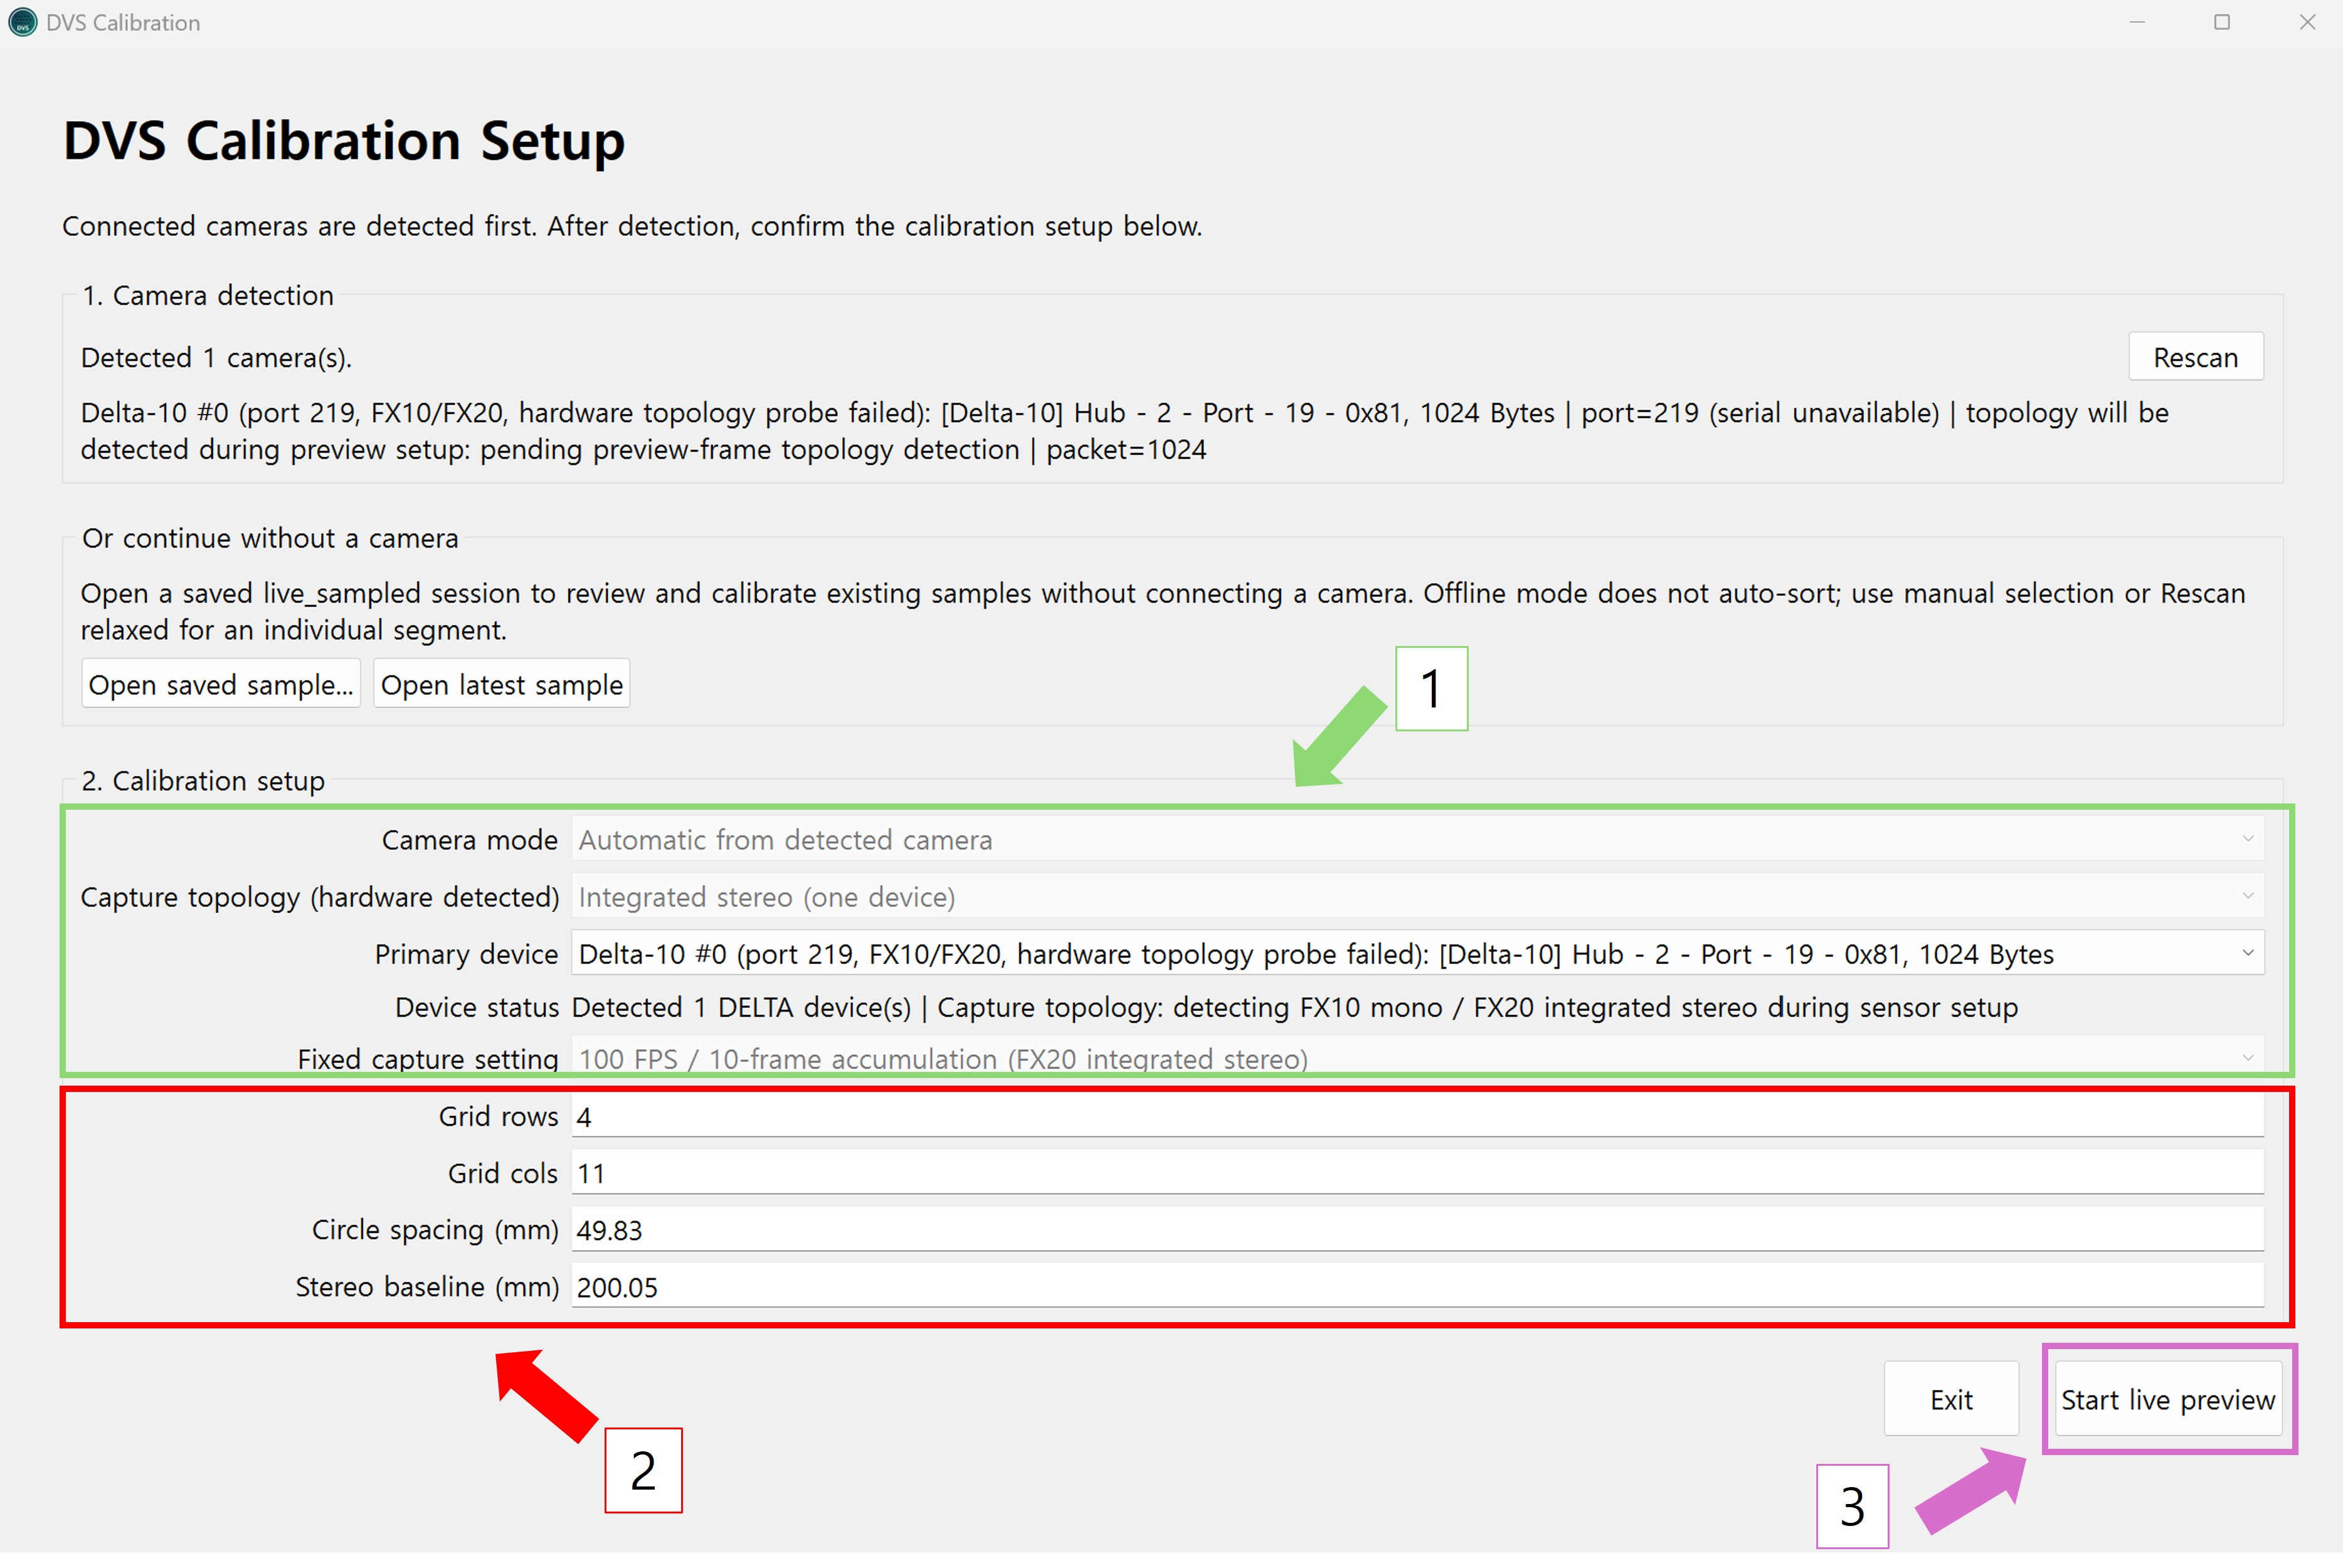
2. Enter grid rows/columns, the measured circle spacing, and the physical stereo baseline.
3. Select Start live preview.
Camera type and mono/stereo topology are determined automatically from the connected hardware. Calibration capture is fixed at 100 FPS and saves images accumulated from 10 frames; these values are not user settings. Enter the circle spacing measured in Section 3.4, together with the physical stereo baseline measured from the monitor and camera assembly. Use Rescan only when the detected device list is incorrect.
4.3 Record calibration segments
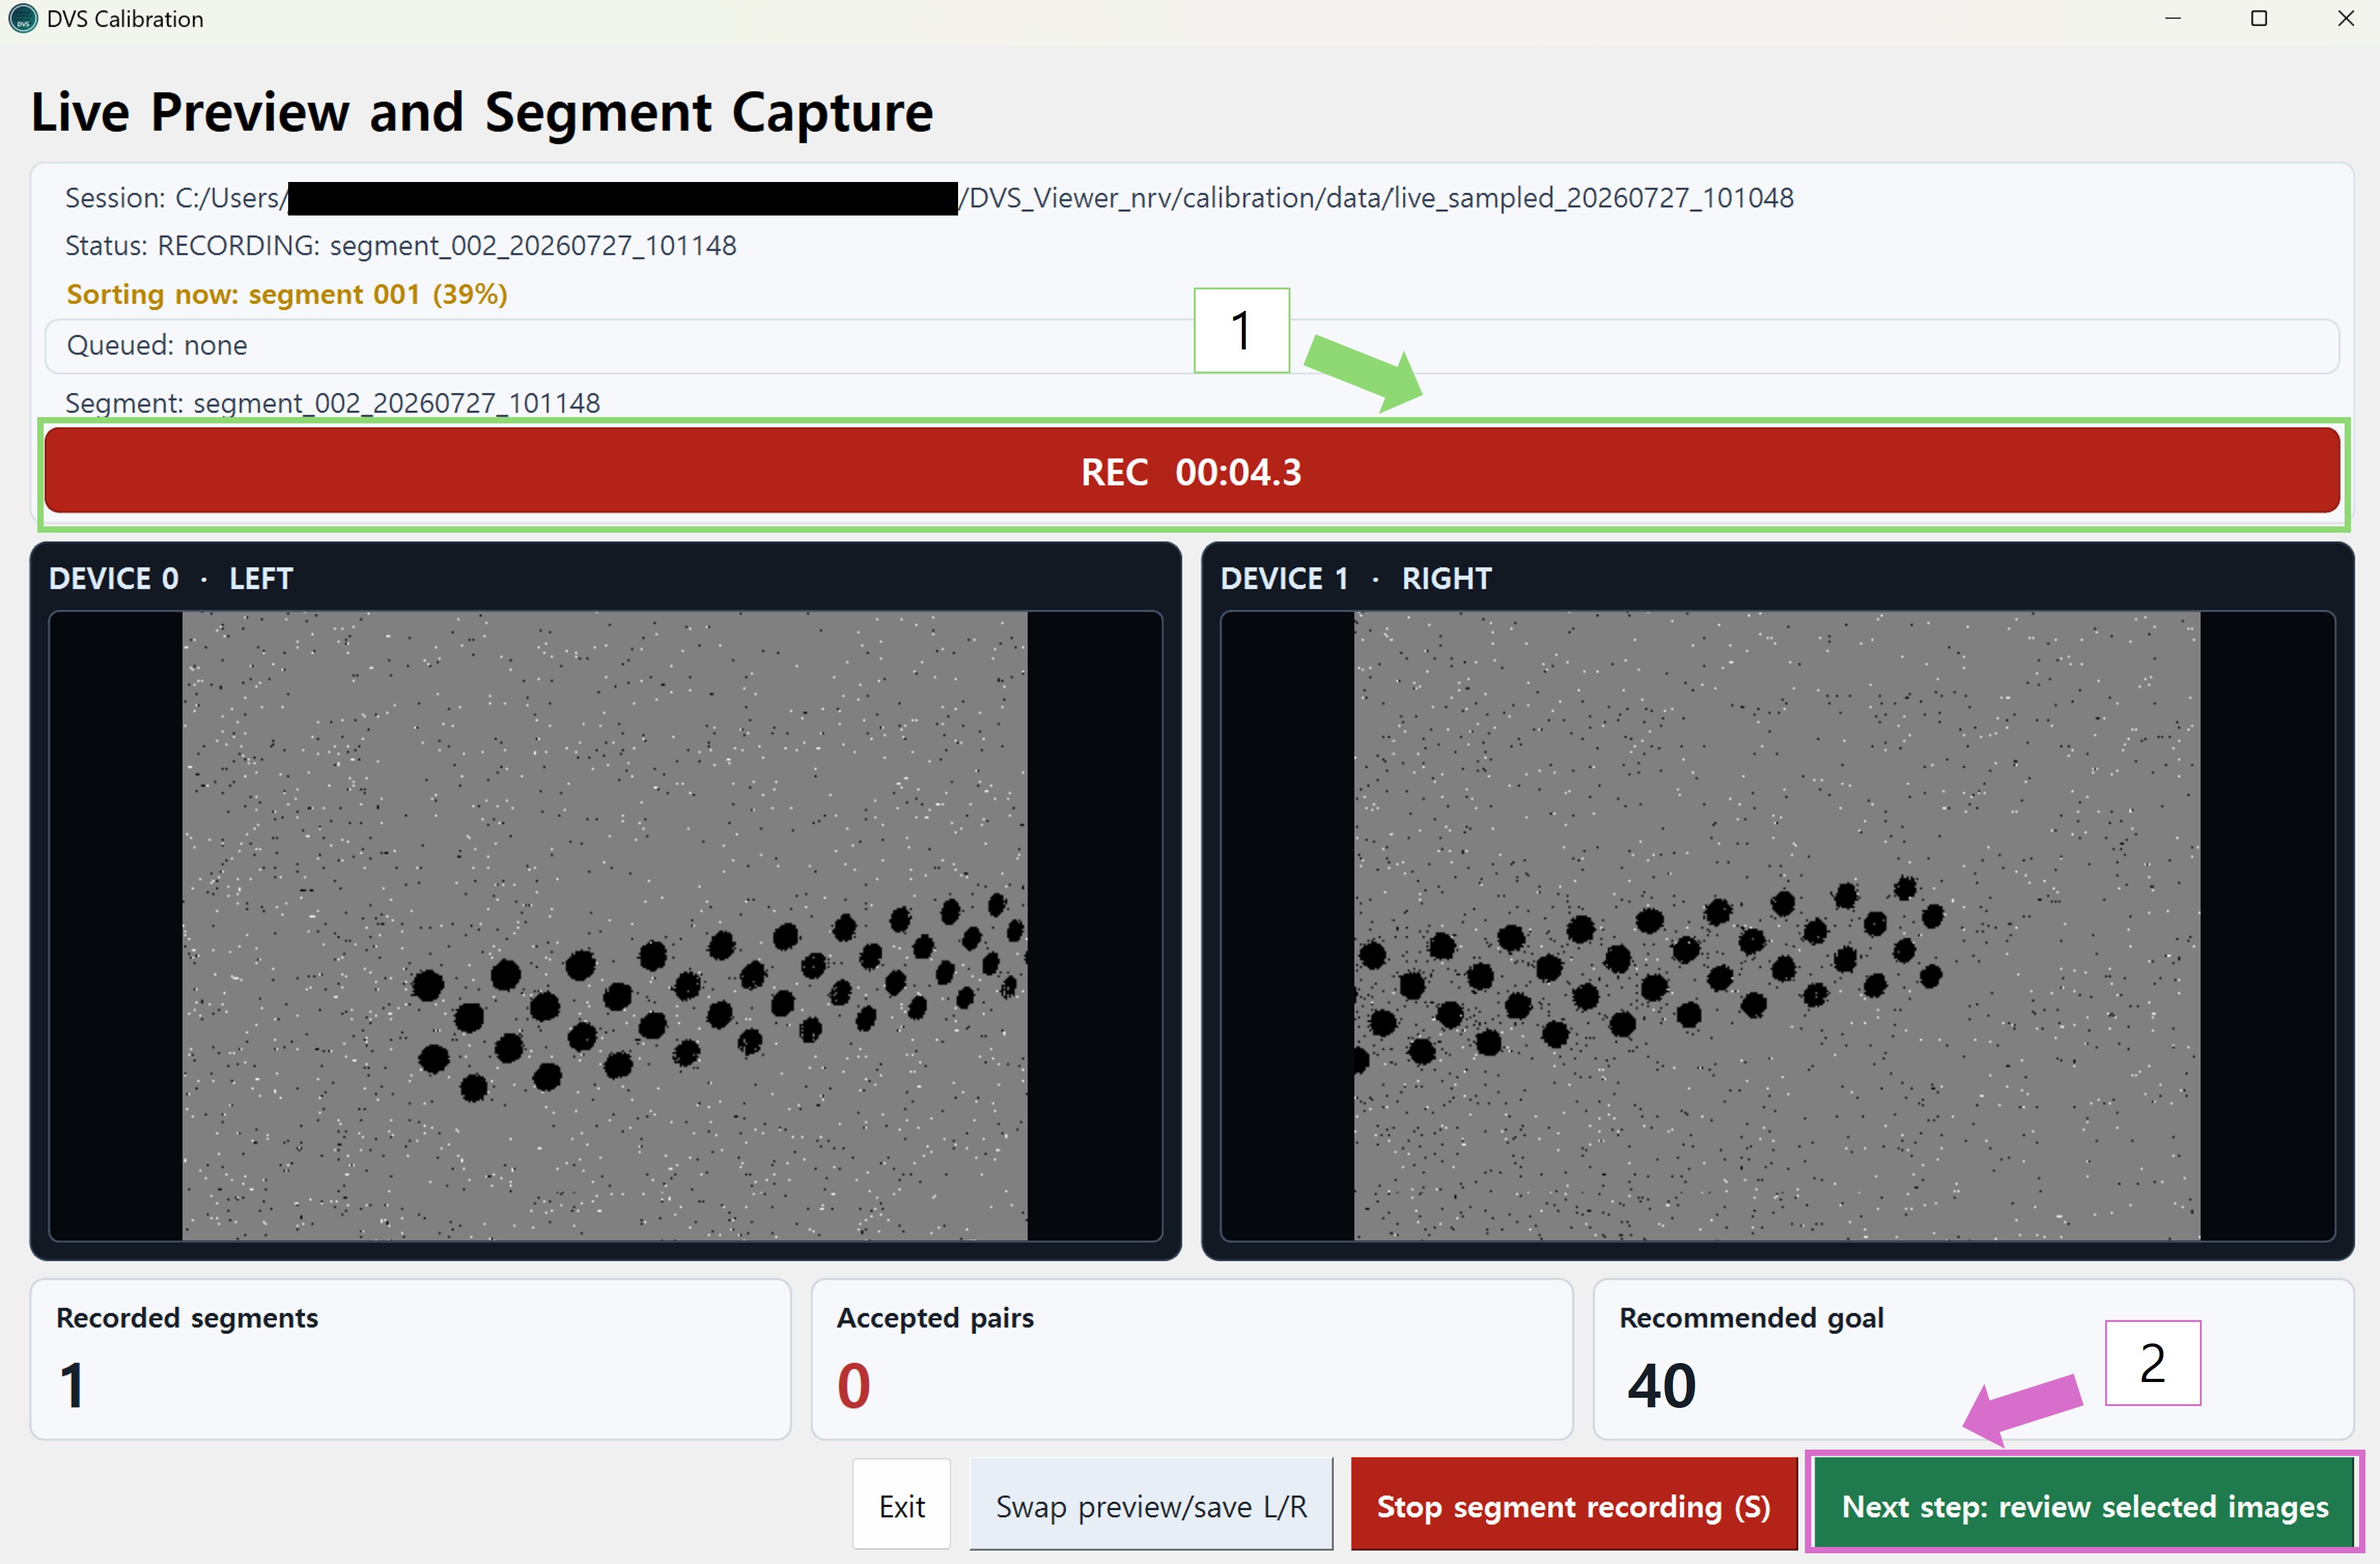
2. After a segment ends, PNG saving and automatic sorting continue in a background worker. Keep the monitor pattern fixed, move the camera and fixed tripod to the next pose, and start the next segment without waiting for sorting to finish.
Preview is shown at 10 FPS, so it can look less smooth while moving. This is intentional display behaviour, not a camera fault or a slow-PC warning. Use this screen to confirm that all circle-grid dots remain separated and that unwanted background events are controlled.
After a segment ends, PNG saving and automatic sorting continue in the background. You can move the camera and fixed tripod to the next pose and start another segment without waiting for sorting to finish. Accepted pairs is the number of recorded segments that sorting has accepted as usable calibration input. For stereo, one accepted pair requires valid left and right observations from the same segment; it can increase after background sorting completes.
Recommended capture: record each pose for about 5 seconds. Move the camera and fixed tripod so that the grid appears at a different image position, distance, or tilt, then repeat for roughly 40 segments. These are recommendations rather than a hard requirement; begin calibration earlier when Coverage and the selected results show that the observations are sufficient.
Use the keyboard S or the on-screen Start/Stop segment recording button to start one segment, then use the same control to stop it. Do not move the camera or fixed tripod while one segment is recording. Do not change the monitor pattern during the segment. For mono, verify a clear grid in the single view. For stereo, both left and right views must contain the same stable target. Do not repeat only the centre pose: move the camera and fixed tripod to cover left, right, top, bottom, centre, different distances, and modest tilts across the sensor area.
4.4 Select inputs in Review
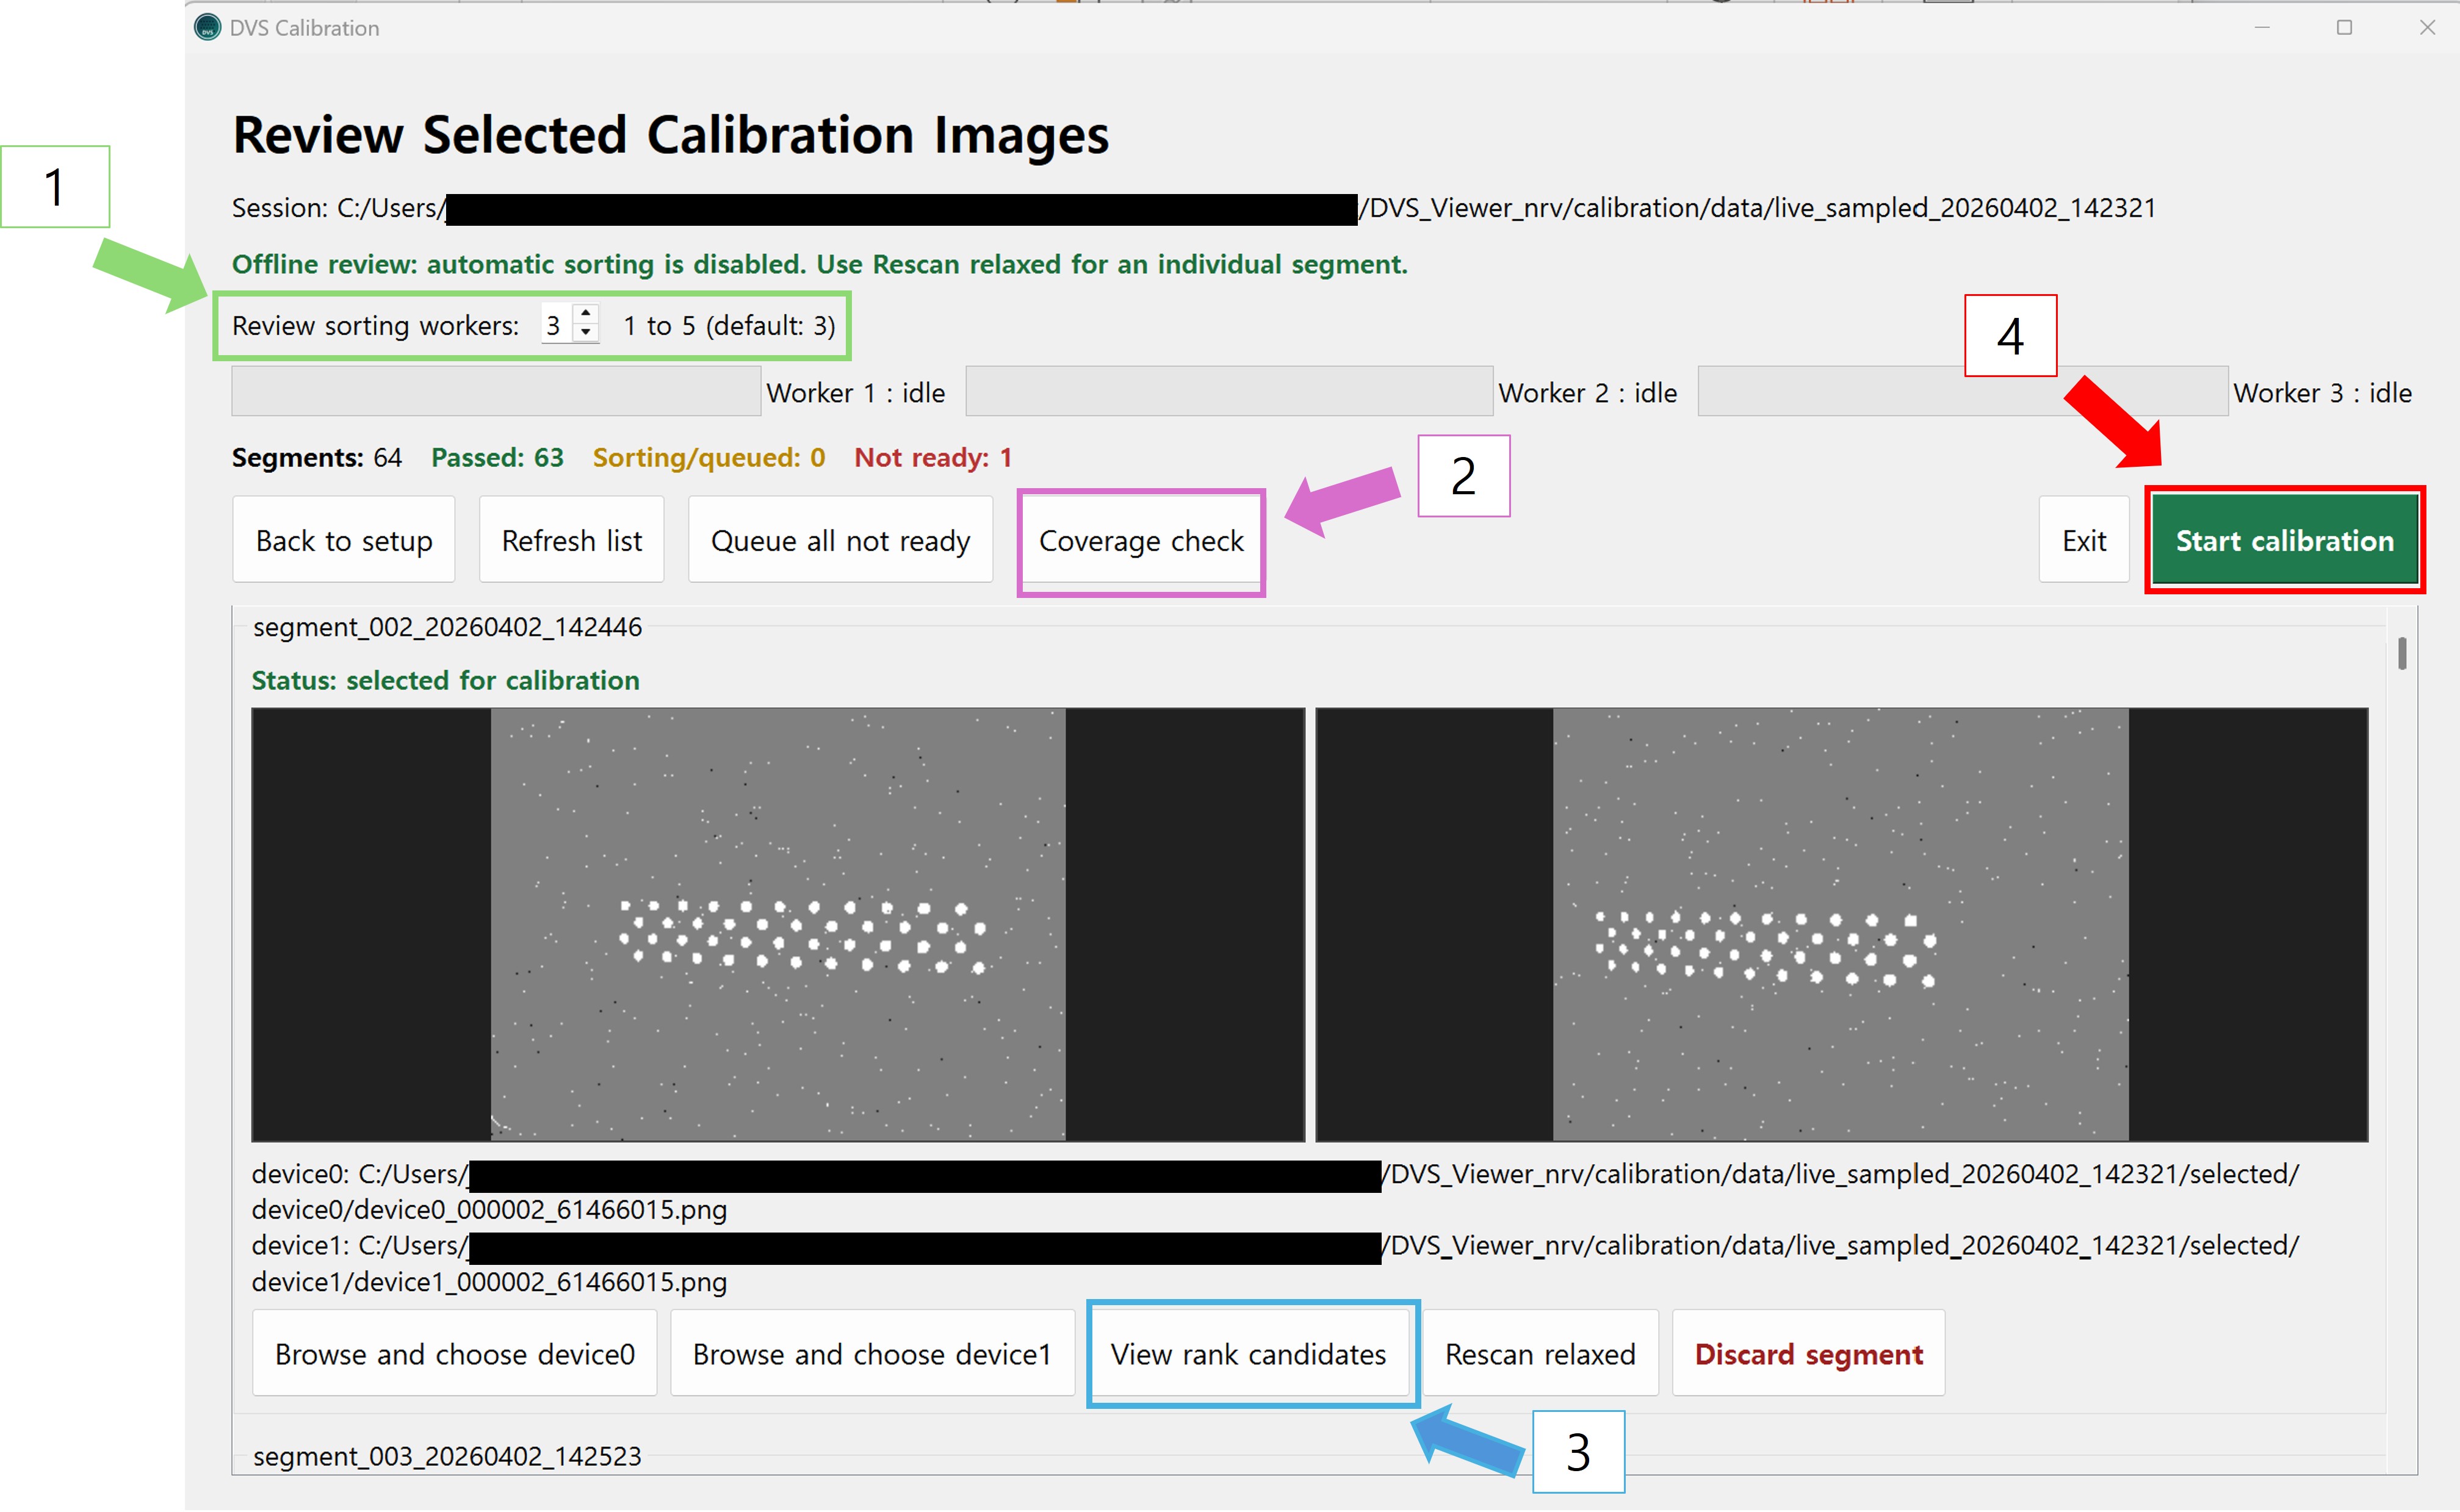
2. Open Coverage Check to inspect distribution across the sensor image.
3. Open View rank candidates to compare automatic selections or choose an image manually when needed.
4. Select Start calibration after enough good inputs are ready.
Sorting scans the saved images in each recorded segment. Because the monitor blinks, one segment contains images captured at different blink phases, so the same circle grid can appear bright, dark, or weak. Sorting detects a valid grid, checks its point order, scores the images, and automatically selects up to the best three as Rank 1–3 candidates. It prepares inputs for calibration; it does not calculate camera parameters.
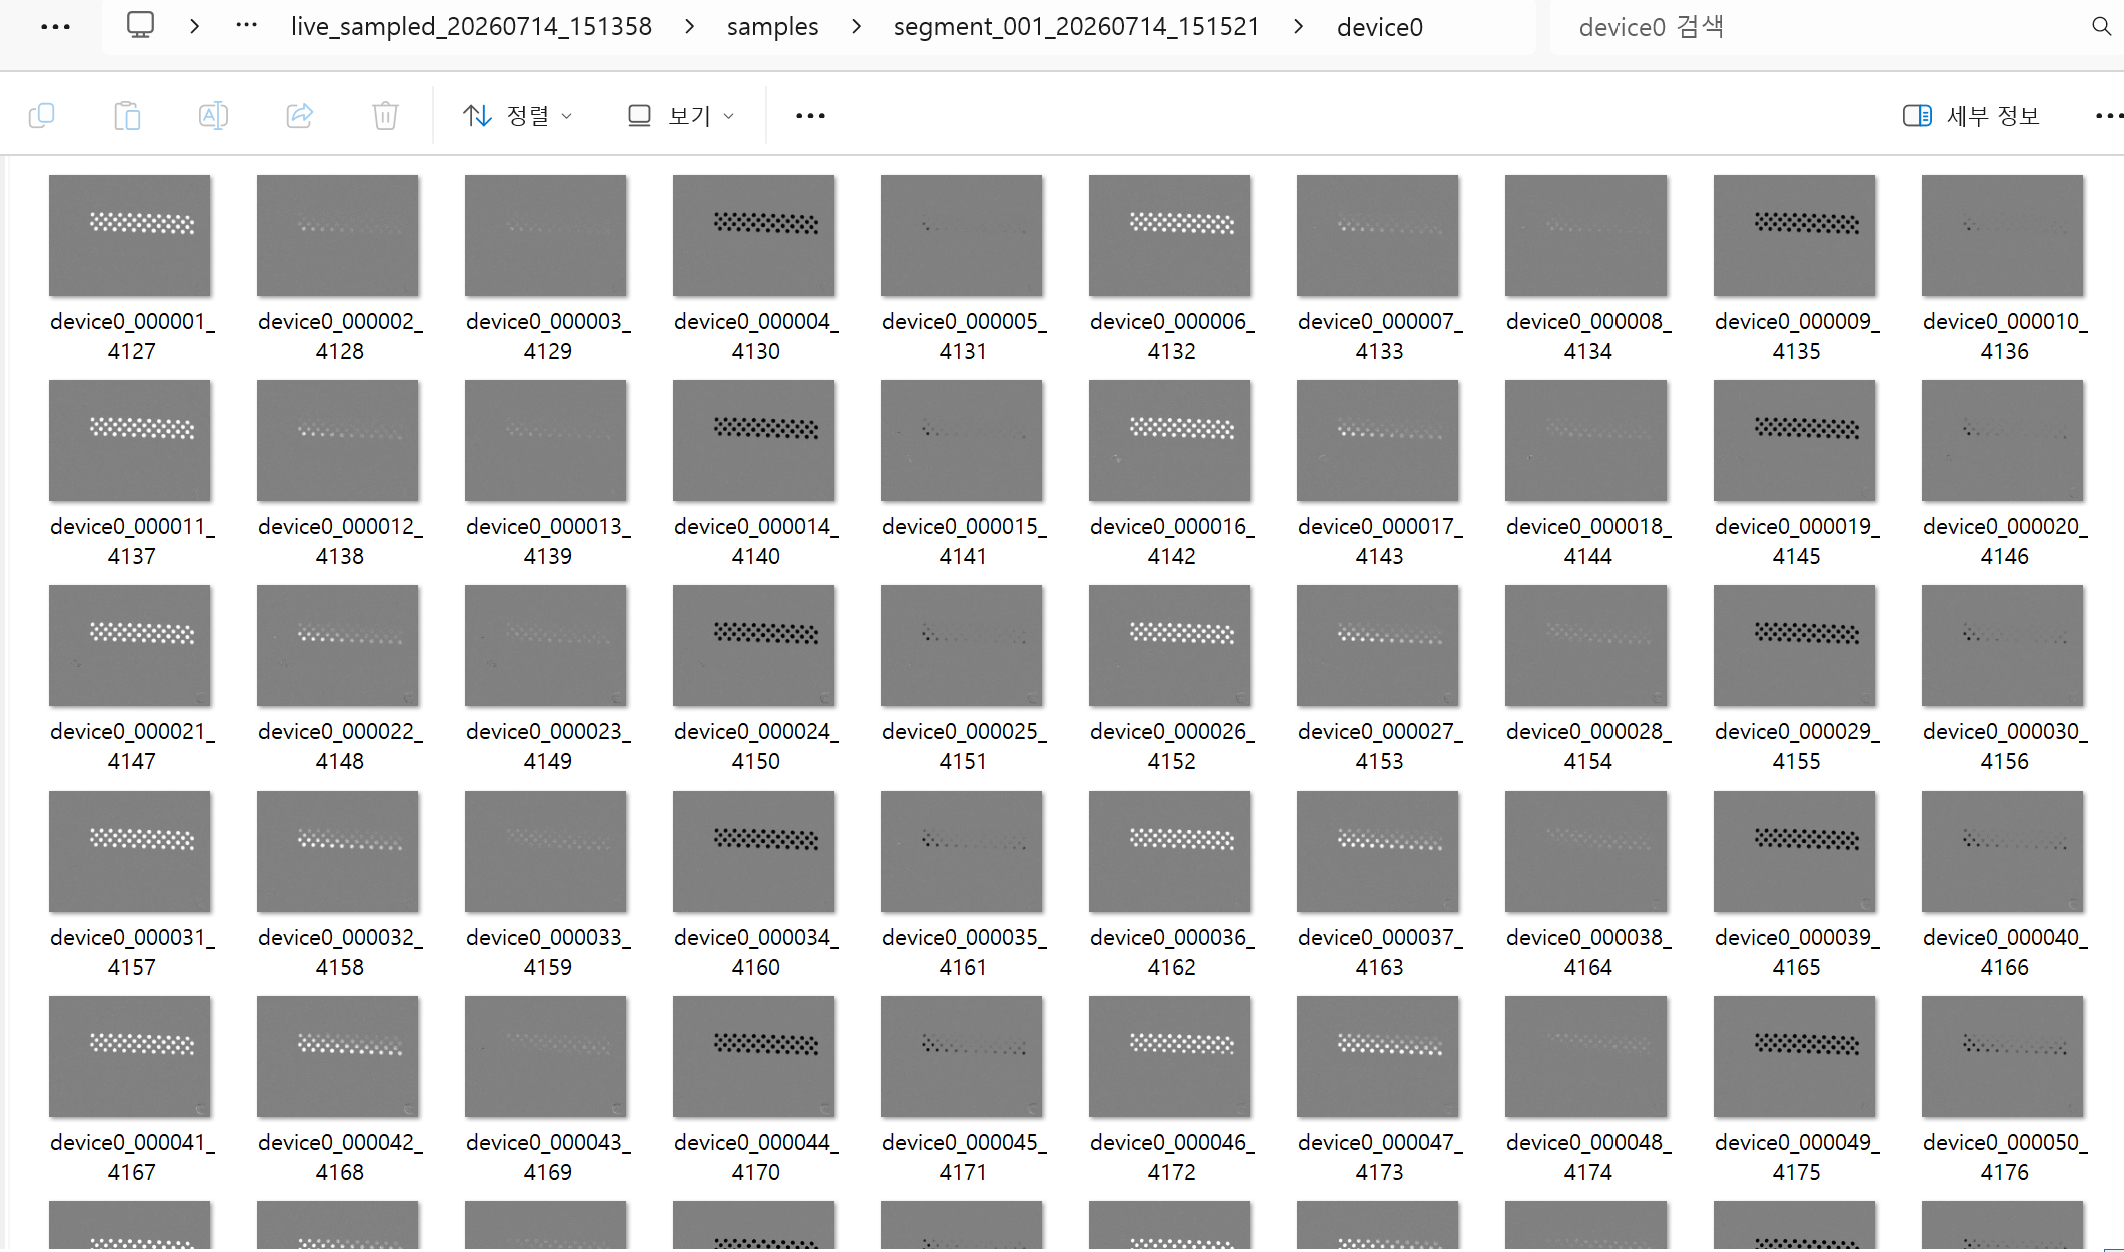
A sorting worker is one background sorting task. Live Preview uses one task to keep camera and display handling stable. Review can sort 1 to 5 segments in parallel (default: 3); lower the count on a slower PC and raise it only when the system remains responsive. Use Browse only to correct an unsuitable automatic selection, and use Rescan relaxed only for a segment with weak detection.
4.5 Understand Rank candidates
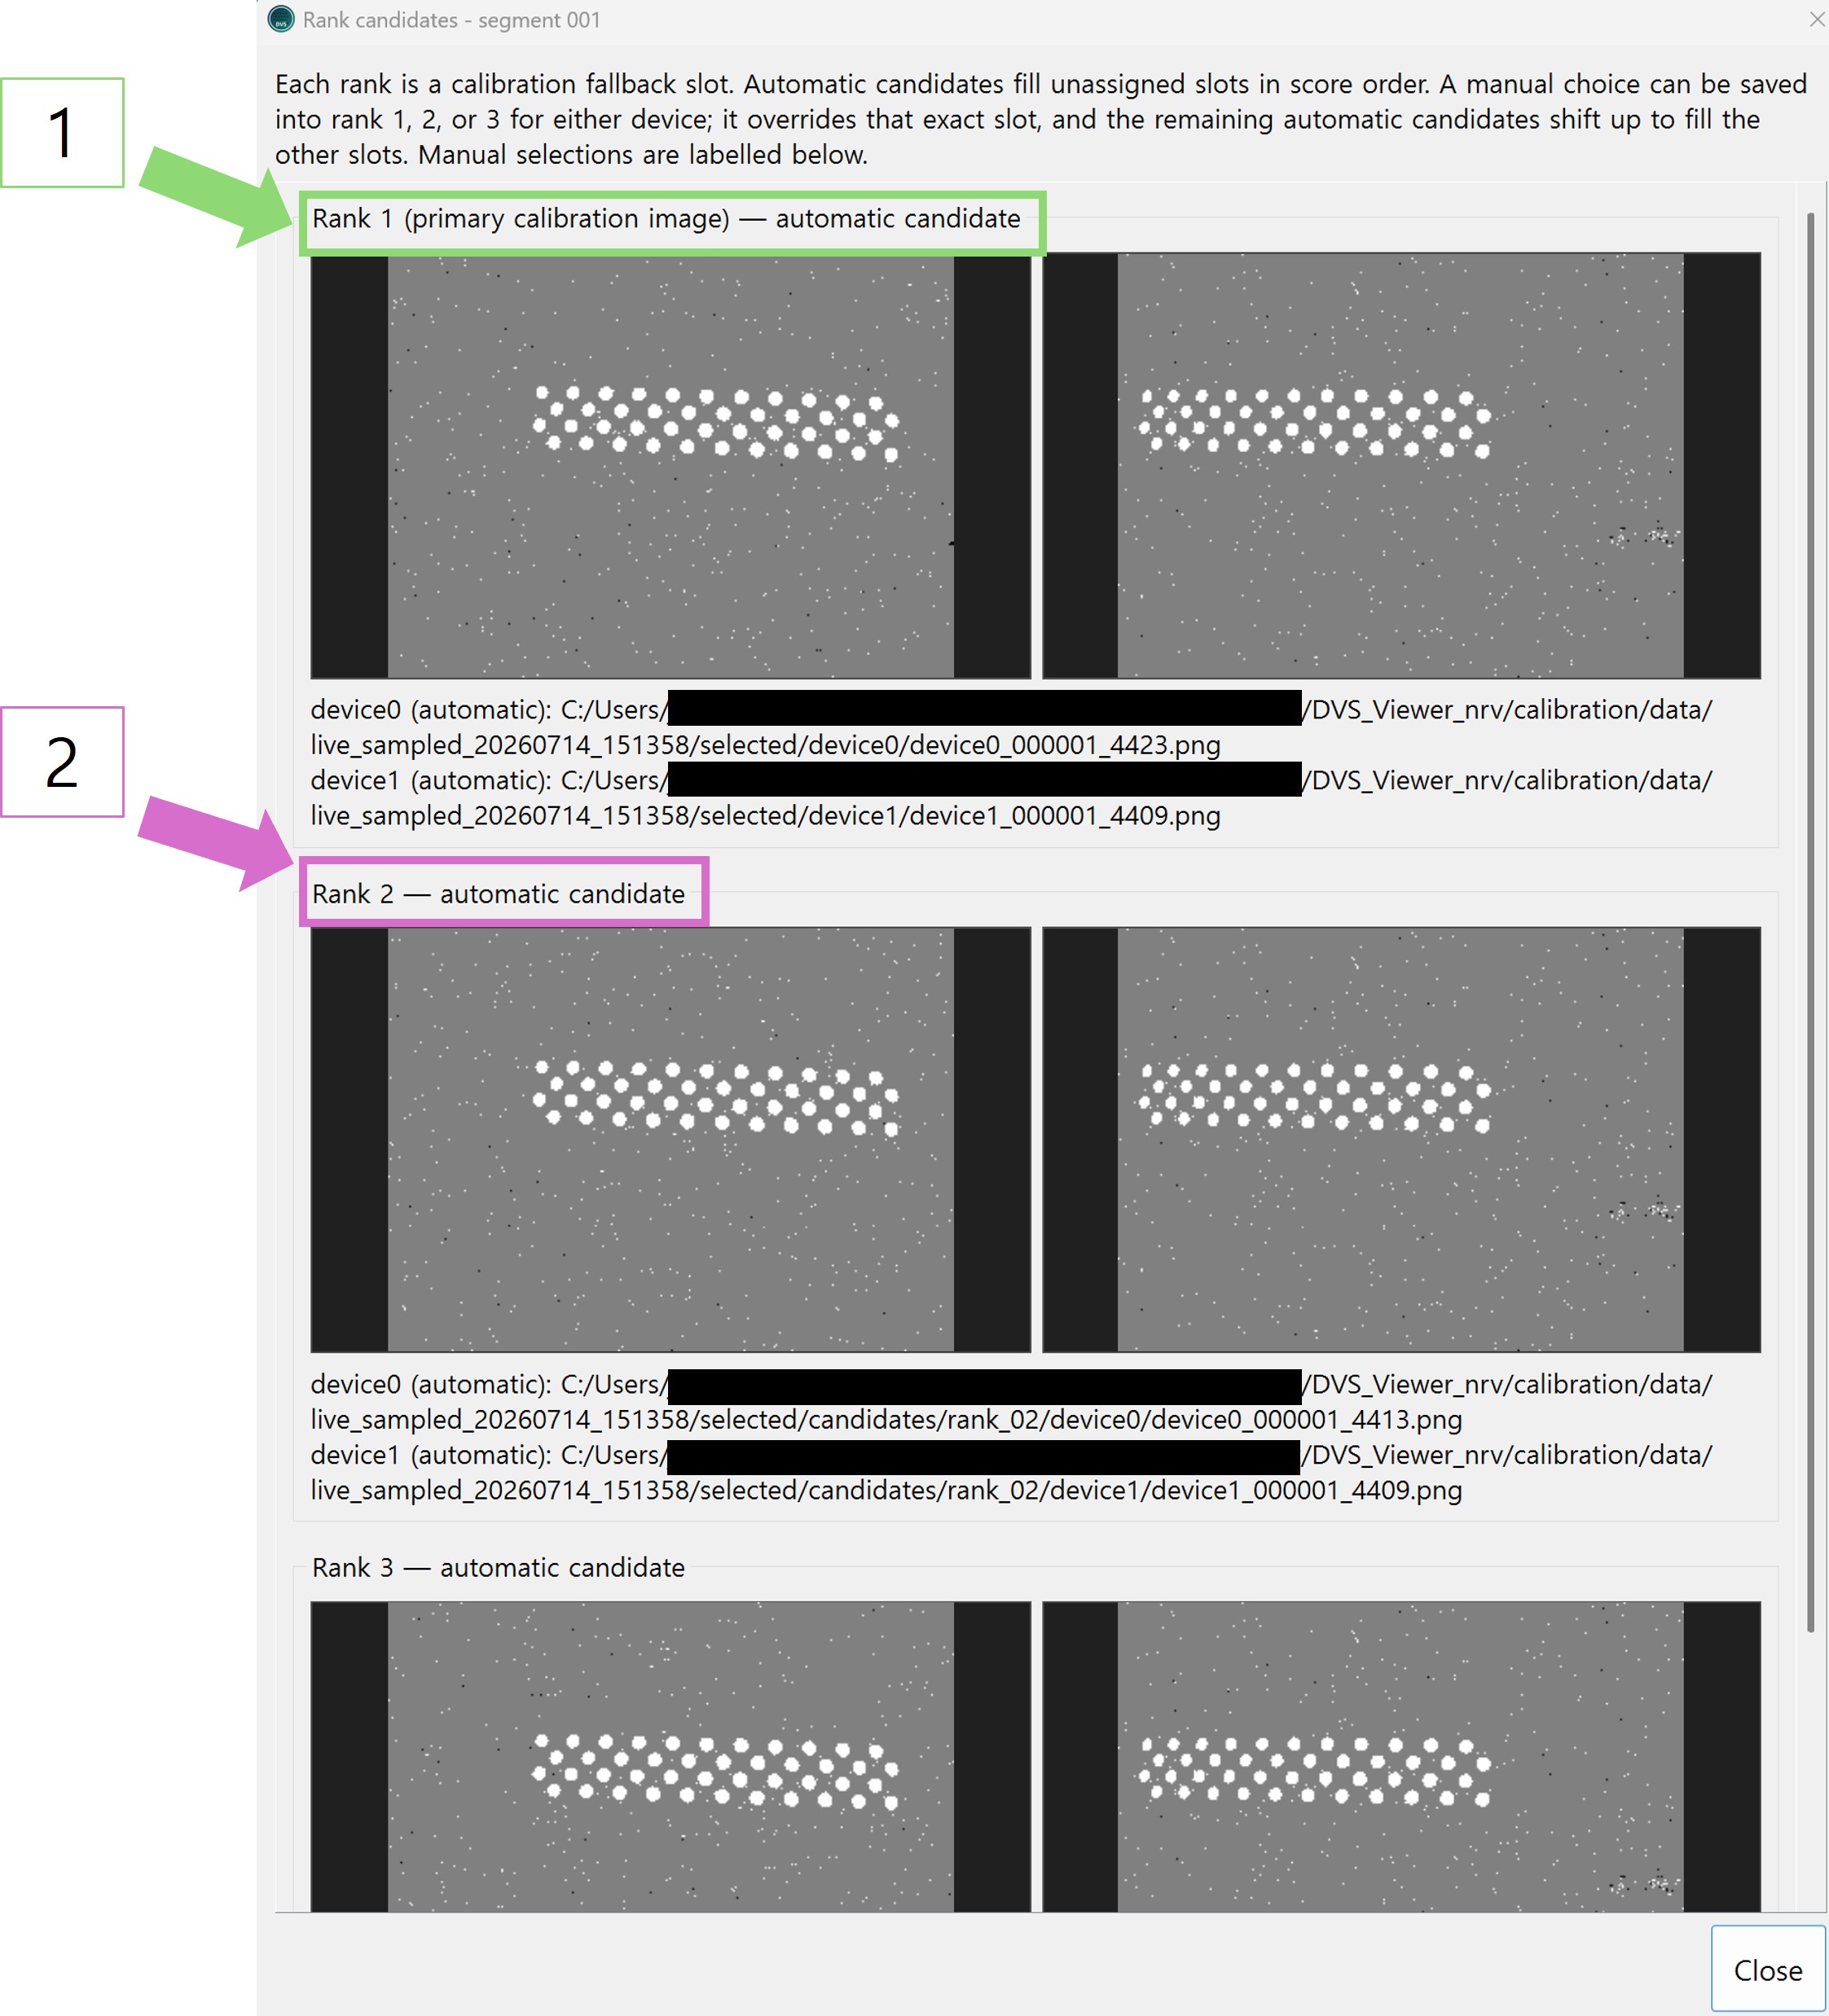
2. Rank 2 and Rank 3 are additional candidates observed at the same pose.
One segment is an image set recorded while the camera and its fixed tripod remain still at one pose. Rank 1–3 are candidate images from that same static pose. When all three agree on the same circle grid, the application averages their cached circle-centre coordinates to make the pose measurement more stable. When automatic selection is unsuitable, Browse can place a chosen image into each rank.
4.6 Check capture coverage
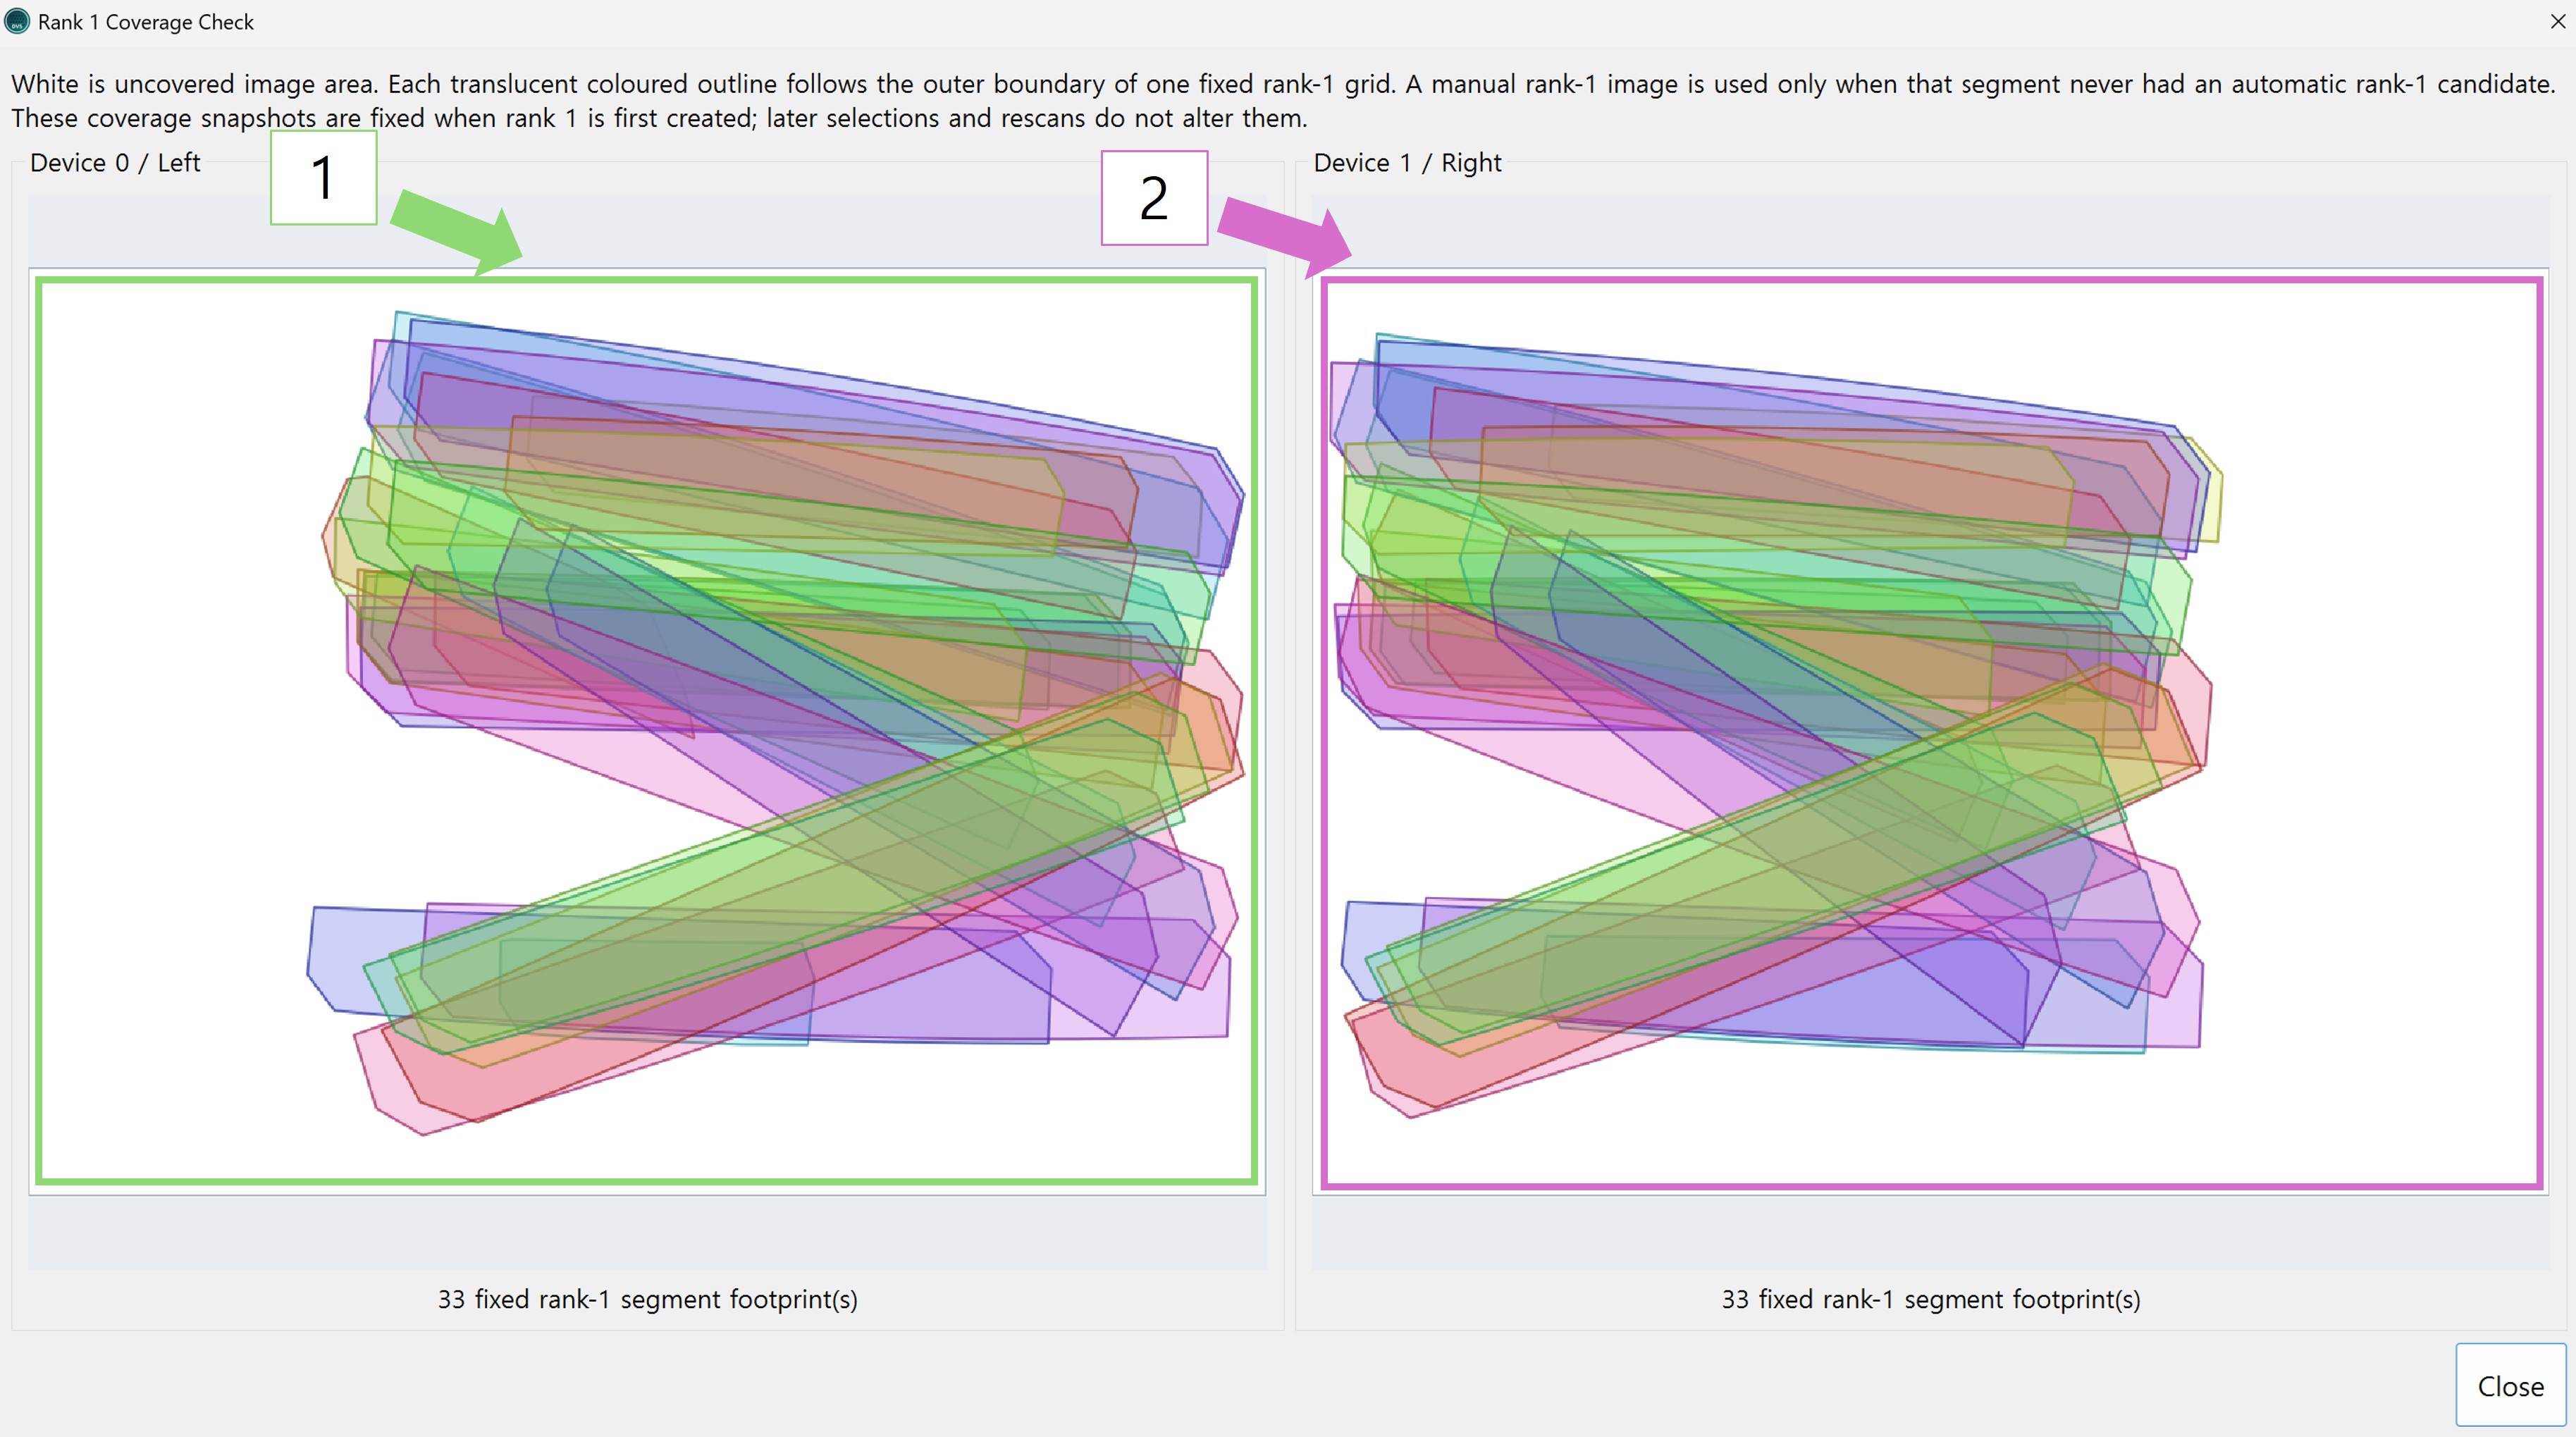
2. Inspect Device 1 / Right as well. White regions have too few circle-grid observations.
Coverage Check shows whether the captured data cover enough of the sensor image. If large white regions remain, move the camera and fixed tripod so that the grid appears in those regions, then record additional segments. When the coloured outlines are well distributed across the image, proceed with calculation. For stereo, inspect both the left and right views.
4.7 Monitor calculation progress
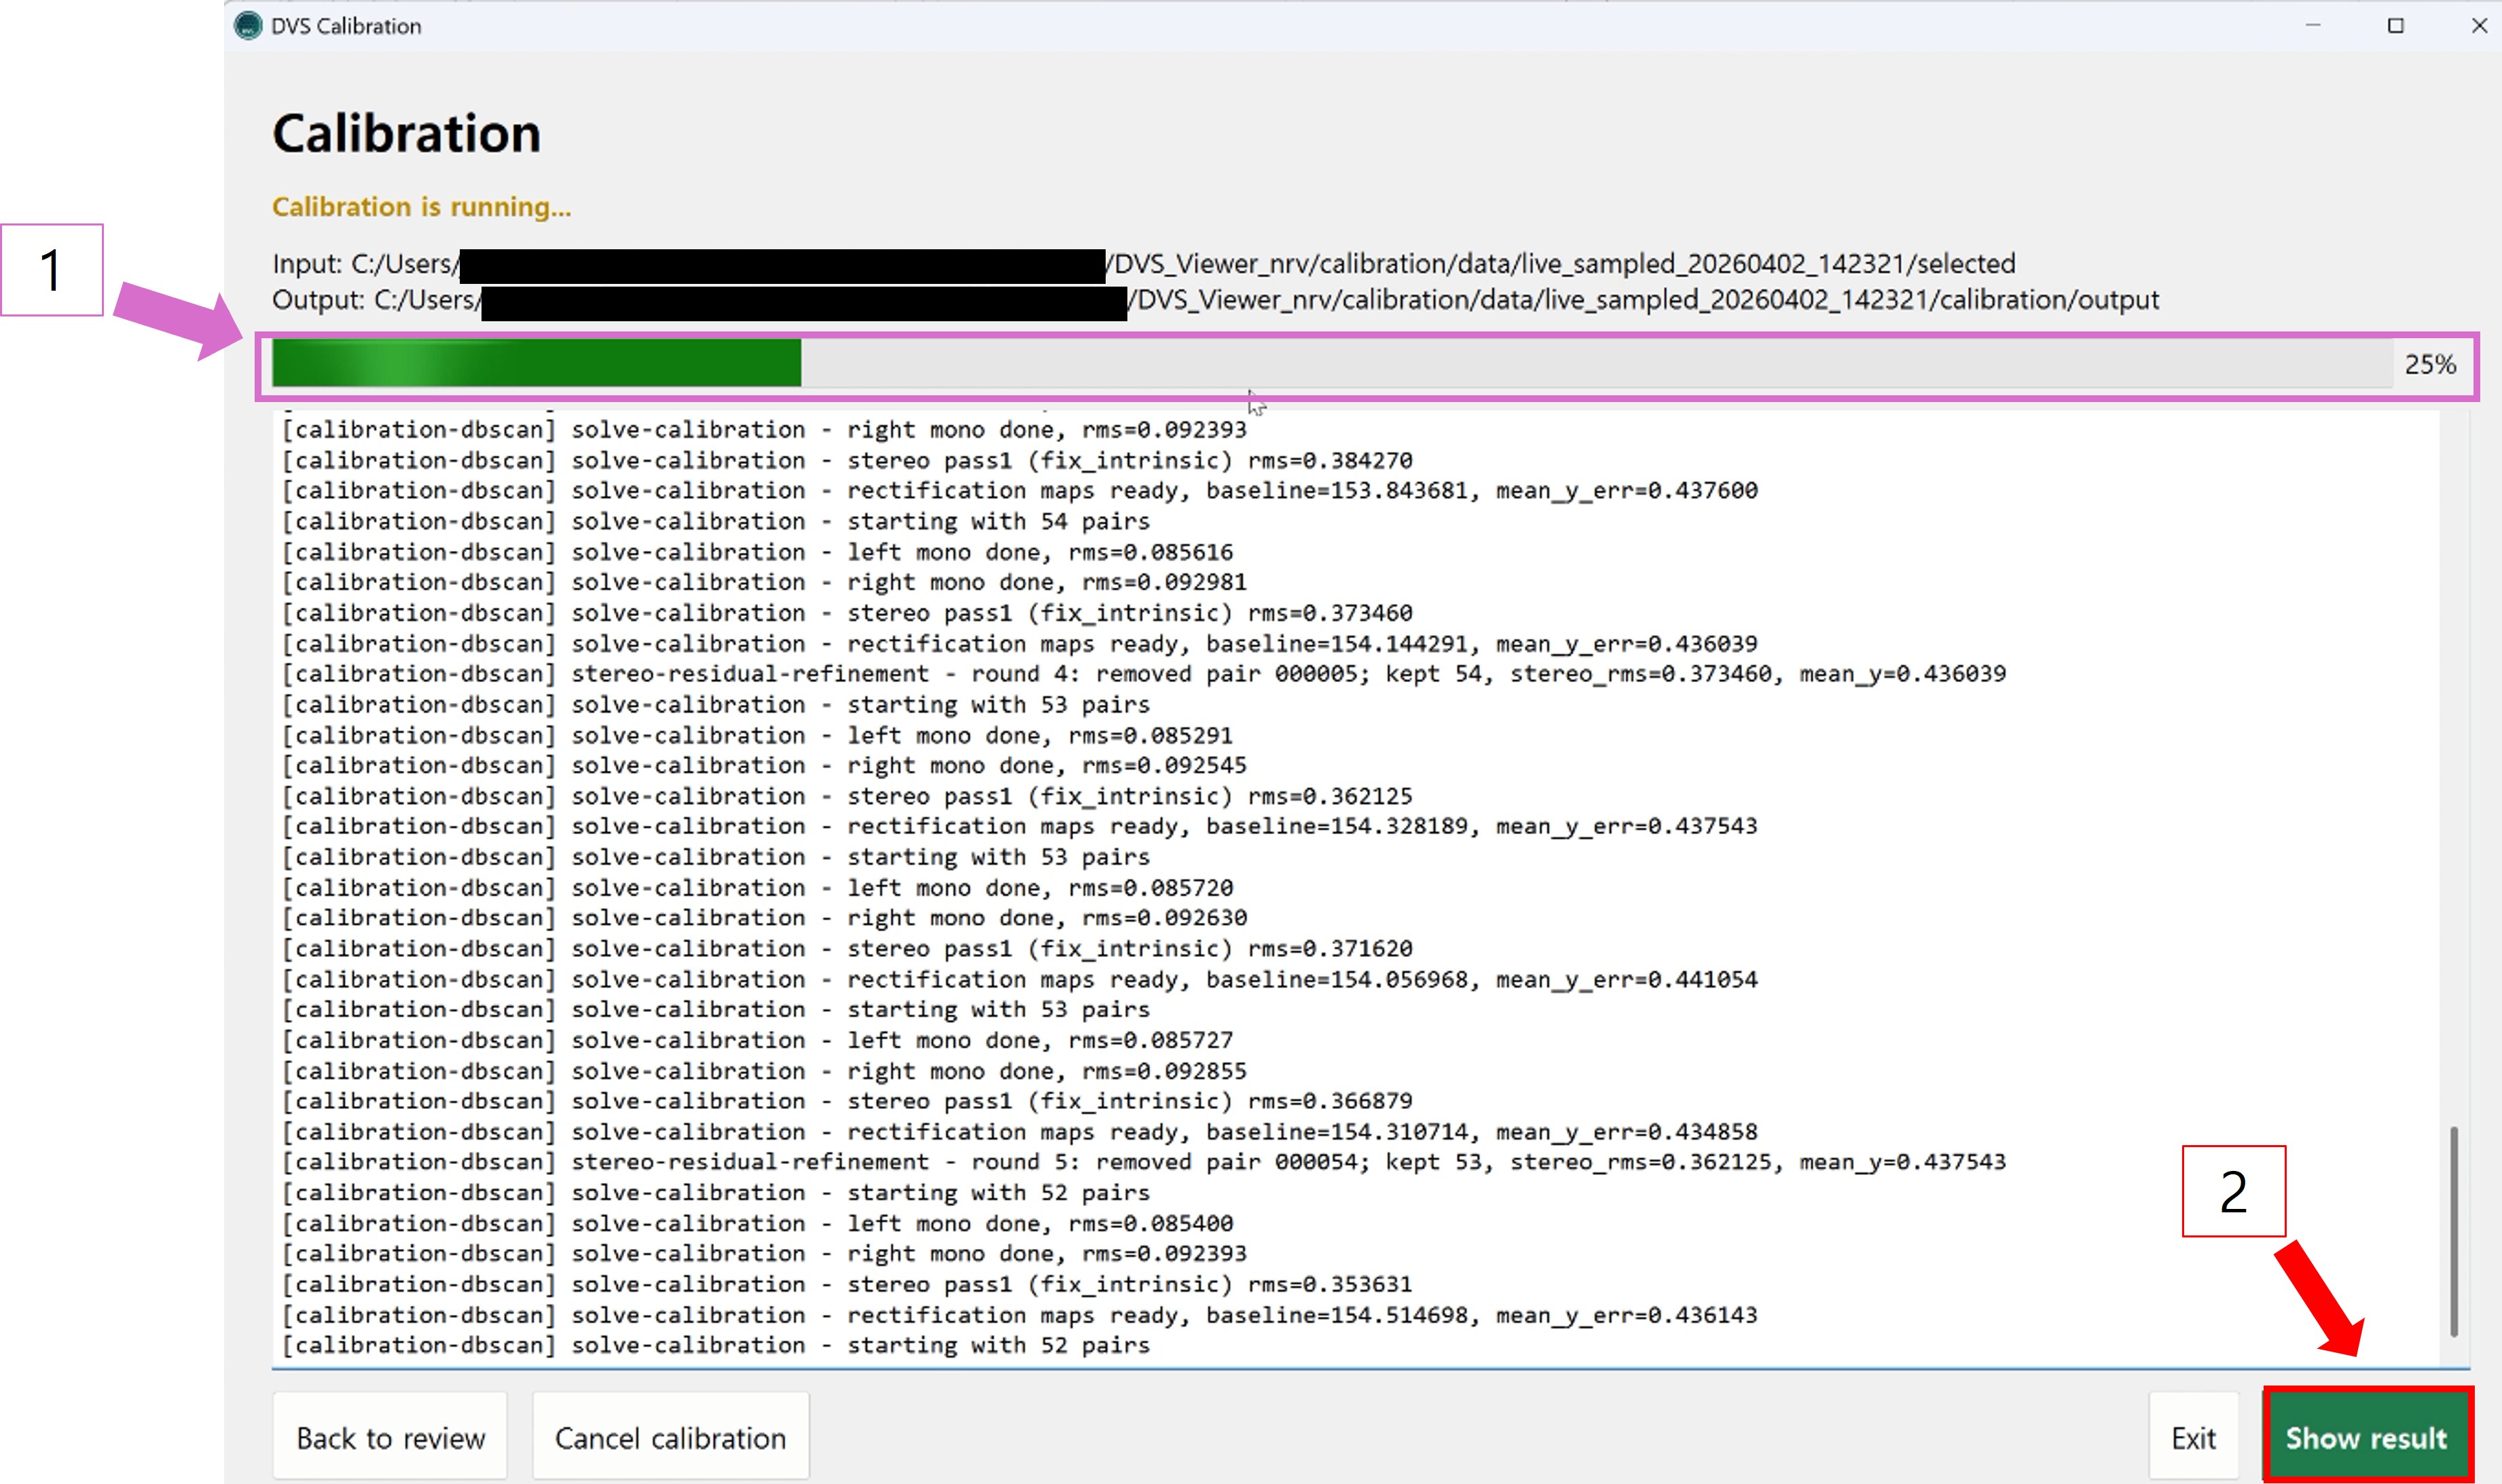
Do not change selected images or camera geometry while the solve is running. Keep the log if calculation fails, then return to Review and inspect the inputs.
4.8 Check and retain results
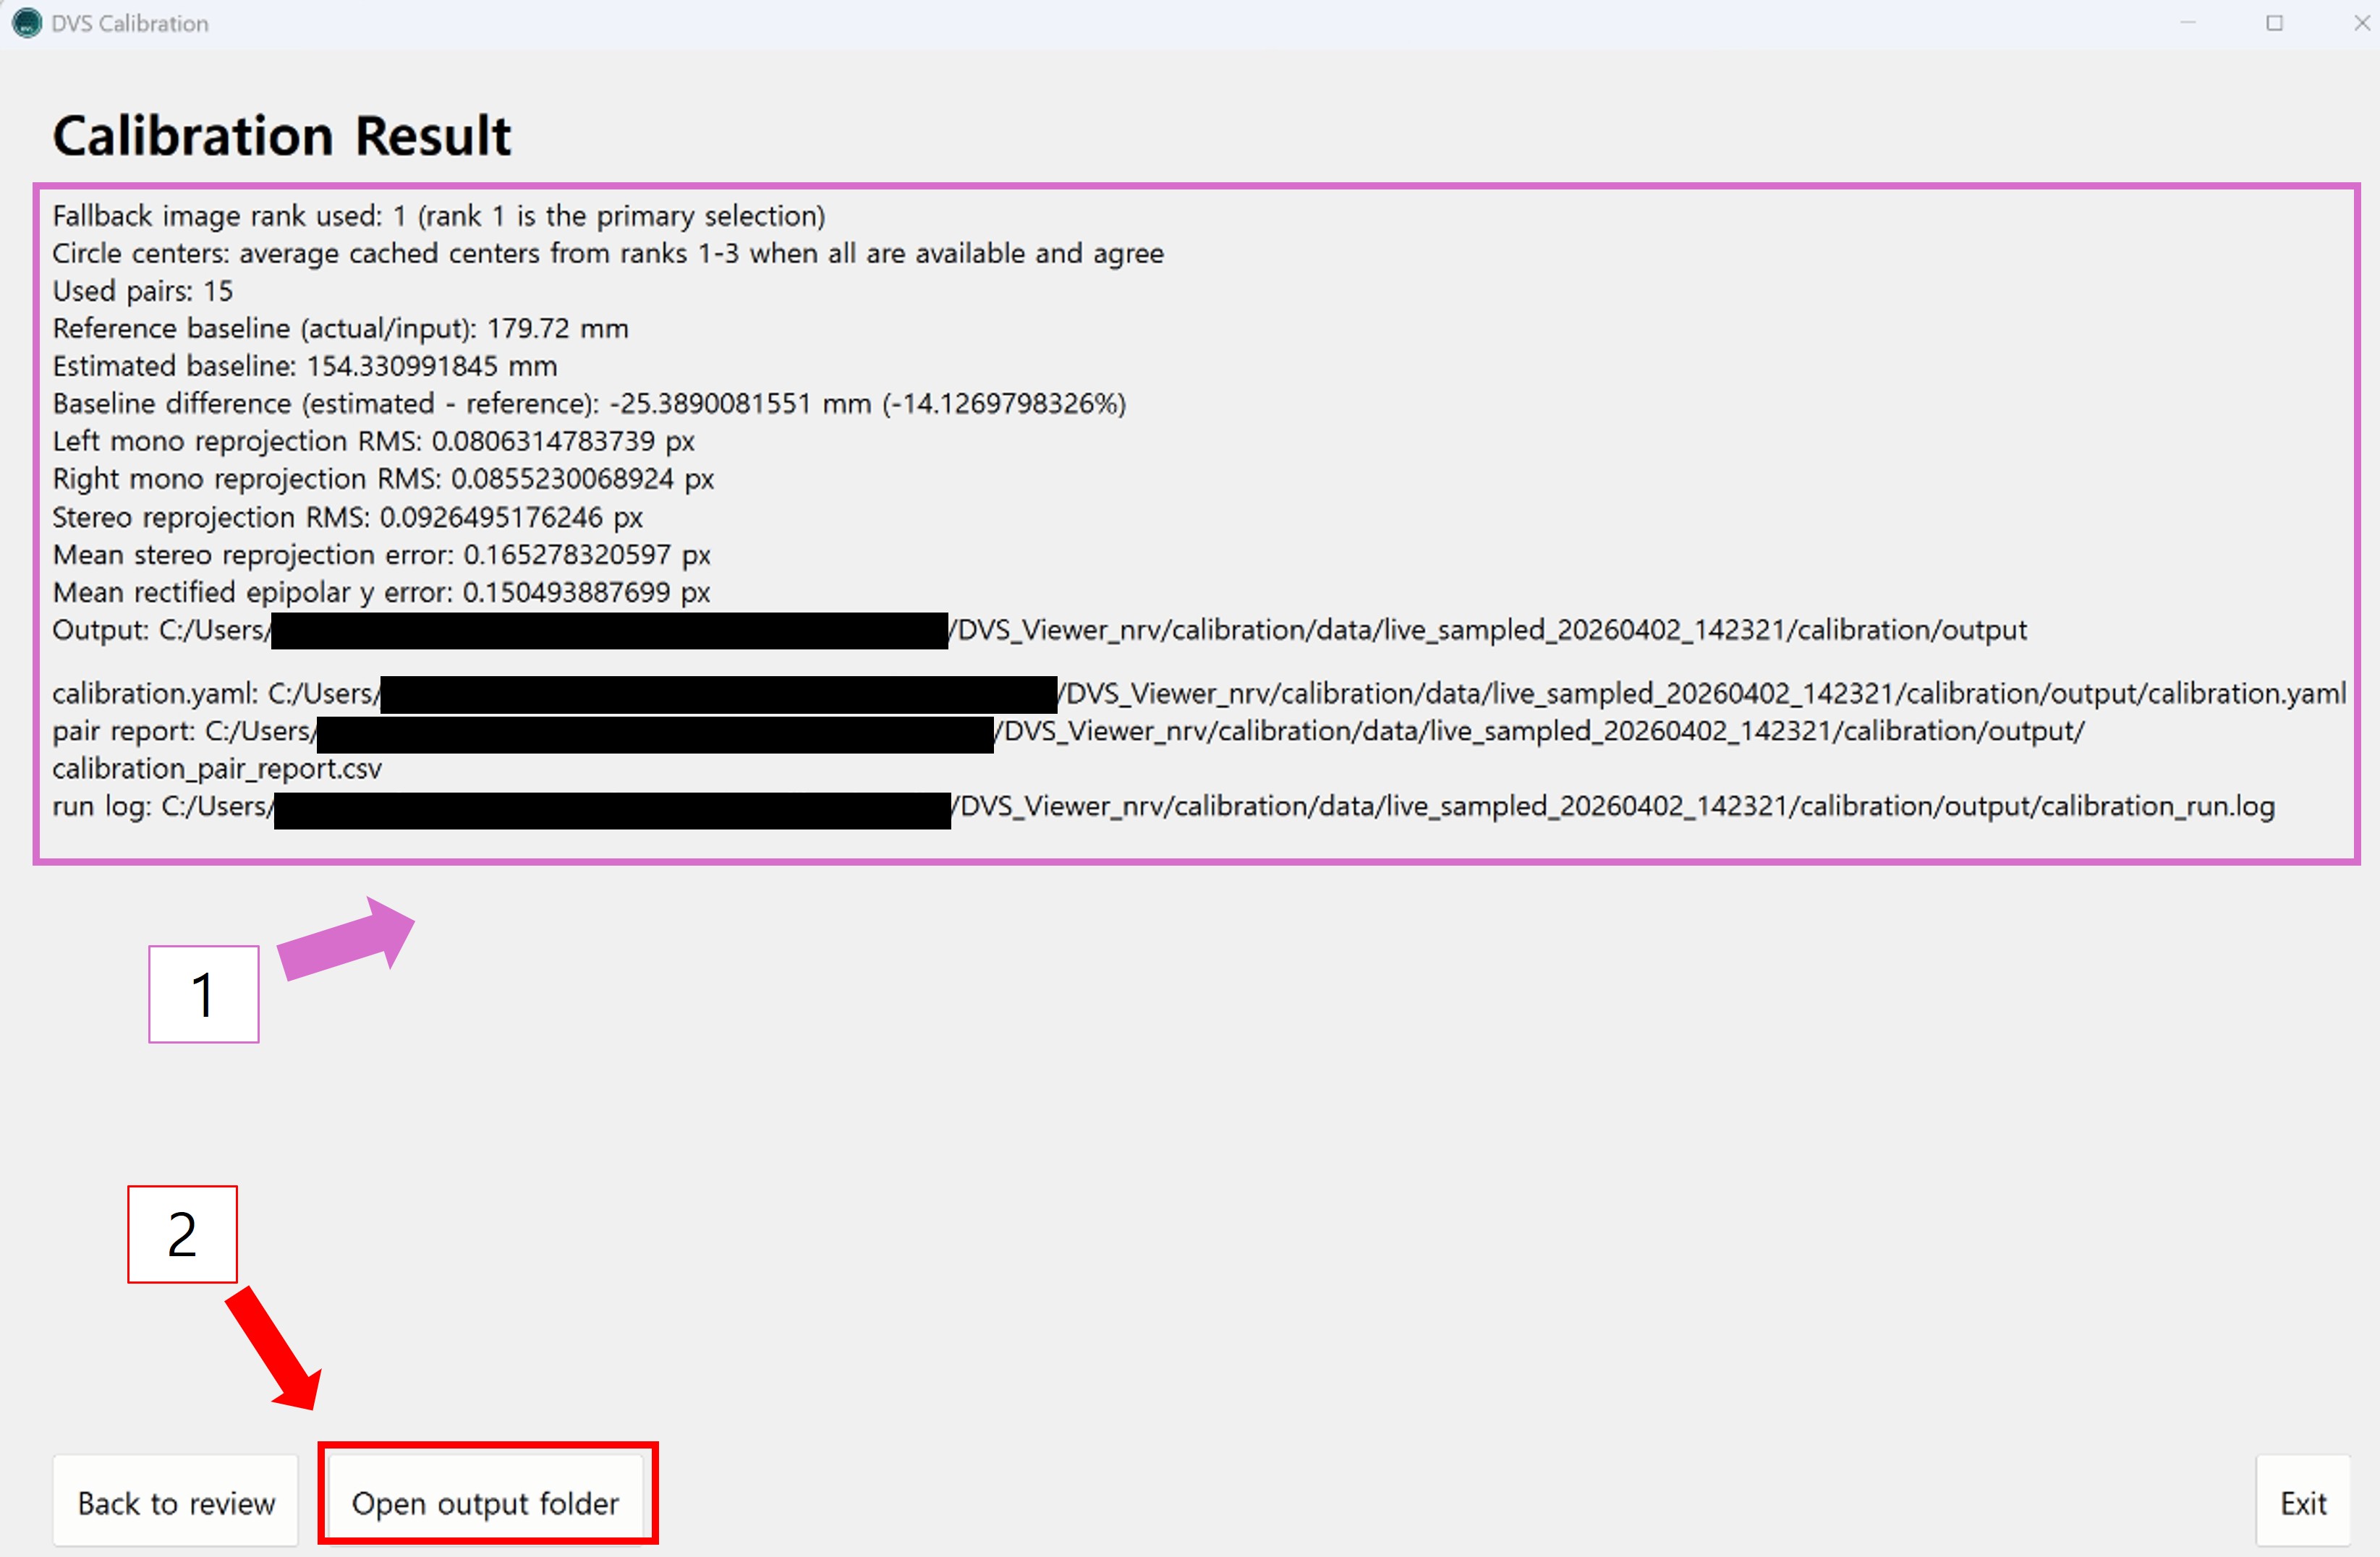
2. Select Open output folder to verify the saved files.
Use this file alone when applying the resulting camera calibration:
calibration.yamlThe output folder also contains a pair report CSV for the image pairs used by the calculation and a run log for the calculation process and excluded inputs.
Retain the matching live_sampled_... session when later review or repeatability records are useful. Its selected images, pair report CSV, and run log let you trace the inputs and calculation.
Supported cameras: DVS Calibration supports Delta-01 as one mono camera or two mono cameras, Delta-10 as one mono camera or two mono cameras, and Delta Stereo. Delta Sigma support is planned.
This guide documents the NRV DVS calibration workflow. If you need to measure pose between an event camera and another camera while calibrating them together, use this workflow as a reference and develop the required integration separately.
If a calibration issue occurs, email contact@nrv.kr with the details and ask that the message be forwarded to Jay, the staff member responsible for calibration.